When I set the goal for myself to contribute to open source back in 2018,
I mostly struggled with two technical challenges:
Python virtual environments, and
Git together with GitHub.
Solving the former is nowadays my job,
so let me write up my current workflow for the latter.
Most people use Git in combination with modern Git forges like GitHub and GitLab.
Git doesn’t know anything about these forges, which is why CLI tools exist to close that gap.
It’s still good to know how to handle things without them, so I will also explain how to do things with only Git.
For GitHub there’s gh and for GitLab there’s glab.
Both of them are Go binaries without any dependencies that work on Linux, macOS and Windows.
If you don’t like any of the provided installation methods, you can simply download the binary, make it executable and put it in your PATH.
Luckily, they also have mostly the same command line interface.
First, you have to login with the command that corresponds to your git forge:
The simplest way to use Git is to use it like a backup system.
First, you create a new repository on either Github or GitLab.
Then you clone the repository:
Terminal window
gitclone<REPO>
From that point on, all you have to do is:
do some work
commit
push
repeat
On its own there aren’t a lot of reasons to choose this approach over a file syncing service like Nextcloud.
No, the main reason you do this, is because you are either already familiar with the git workflow, or want to get used to it.
You will want to start out with the latest upstream changes in the default branch.
You can find out its name by running the following command:
Terminal window
gitls-remote--symreforiginHEAD
Chances are it displays either ref/heads/main or refs/heads/master.
The last component is the branch, so the default branch will be called either main or master.
Before you start a new branch, you will run the following two commands to make sure you start with the latest state of the repository:
Terminal window
gitswitch<DEFAULT-BRANCH>
gitpull
You switch and create a new branch with:
Terminal window
gitswitch--create<BRANCH>
That way you can work on multiple features at the same time and easily keep your default branch synchronized with the remote repository.
The next step is to open a pull request on GitHub or merge request on GitLab.
Even though they are named differently, they are exactly the same thing.
Therefore, I will call both of them pull requests from now on.
The idea of a pull request is to integrate the changes from one branch into another branch (typically the default branch).
However, you don’t necessarily want to give every potential contributor the power to create new branches on your repository.
That is why the concept of forks exists.
Forks are copies of a repository that are hosted on the same Git forge.
Contributors can now create branches on their own forks and open pull requests based on these branches.
If you don’t have push access to the repository, now it’s time to create your own fork.
I don’t know why gh repo fork doesn’t set that for you,
but now we need to tell gh which repository is the default.
That way it knows against which repository you want to extend when opening a pull request.
We want to extend the original repository, so let’s select that with the interactive picker.
Terminal window
ghreposet-default
Terminal window
glabrepofork--remote
Without the forge CLI tools, you first fork the repository in the web interface.
Then, you run the following commands:
Terminal window
gitremoterenameoriginupstream
gitremoteaddorigin<FORK>
When you cloned your repository, Git set the default branch of the original repo as the upstream branch for your local default branch.
This is preserved by the remote rename, which is why the default branch can still be updated from upstream with git pull and no additional arguments.
pr create directly pushes and sets up your branch, and then opens the pull request for you.
If you have a fork available, it will ask whether you want to push your branch there:
With Git, you first have to tell it that it should create the corresponding branch on the remote and set it as upstream branch.
Terminal window
gitpush--set-upstreamorigin<BRANCH>
Next, you open the repository in the web interface, where it will suggest opening a pull request.
The upstream branch of your local branch is now configured, which means you can update your remote by running git push without any additional arguments.
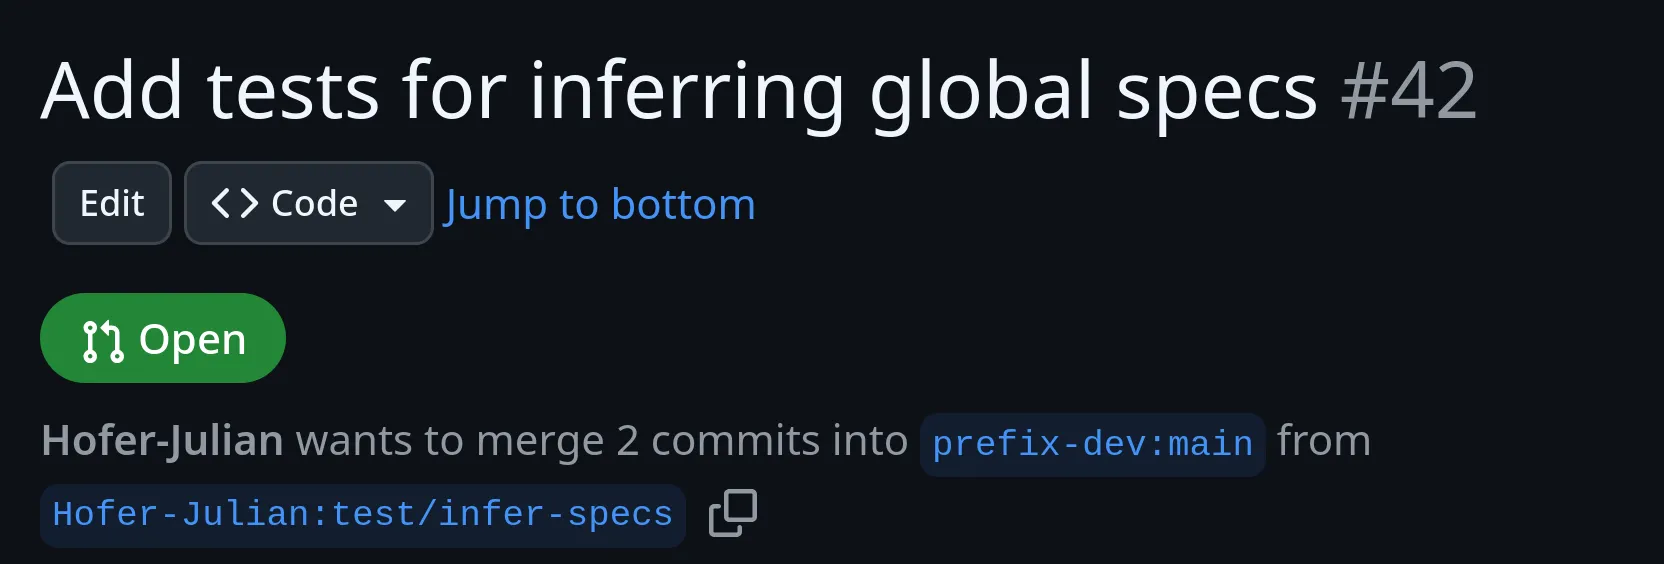
In this example, can see that the pull request proposes changes from the repository by Hofer-Julian to a repository by prefix-dev.
If the both branches are on the same repository, click on the tab “Same Repository” above.
If the pull request comes from a fork, you execute the following commands:
Terminal window
# Add a remote for the user who opened the pull request
gitremoteadd<USER><FORK_OF_USER>
# Fetch their repo
gitfetch<USER>
# Check out their branch
gitswitch<BRANCH>
In this example, can see that the pull request proposes changes from the repository by Hofer-Julian to a repository by prefix-dev.
If the branches are on the different repositories, click on the tab “Fork” above.
If it’s the same repository, you run checkout the pull request like this:
When I first heard of gh’s predecessor hub, I thought this is merely a tool for people who insist on doing everything in the terminal.
I only realized relatively recently that Git forge tools are in fact the missing piece to an efficient Git workflow.
Hopefully, you now have a better idea of the appeal of these tools!
Many thanks to Sabrina and Lucas for their comments and suggestions on this article
You can find the discussion at this Mastodon post.